
Friday, September 24, 2010
Upscaled watercolors
For today we had to do a watercolor but larger. 13" x 19" to be precise, actually mine ended up being 15" x 20" because i cut a big ole piece of illustration board up to four equal pieces. I was thinking something of this scales deserves to be epic. I decide to go with a dinosaur because no small piece of watercolor paper can contain its awesomeness. This one is mostly line driven because if feel i do a lot better when i know i get to use line as well. the scan really doesn't do it justice it's a lot brighter, but here it is:

Wednesday, September 22, 2010
The Goats are In!
Continuing with the goat and cheese theme i came with a few more ideas for my poster. Both are playing with a literal interpretation of the idea. The one on the top is pretty close to what goat cheese looks like: white, boring, and unidentifiable. I jazzed it up with some goat features. And the one on the bottom is a cheesy goat, a stand-up comedian to be more specific. Lounge singer could also apply. Maybe if he were in front of a car he could be a used car salesman, that's pretty cheesy.
 |
| It's goat cheese, literally! |
 |
| Not goat cheese, but a cheesy goat |
Monday, September 20, 2010
Something's cheesy...
We are now working on an illustration for an on-campus event. I chose the small-scale cheese making group. I'm not too sure what all the specifics were becaue when i went back in to truview, the info was gone...oh well. I knew it had to do with goat cheese (that's what they were going to be making) so i went with that. Not knowing what goat cheese looke dlike, i painted this up:

As i would find out, goat cheese is white, so i'm contemplating changing the color or going in a different direction all together, otherwise, it's not a bad little illustration.

As i would find out, goat cheese is white, so i'm contemplating changing the color or going in a different direction all together, otherwise, it's not a bad little illustration.
Mugshot
We had four hours to paint ourselves, i did a few warm-up paintings, but ended up with the train-wreck below:
 My only complaint is that the mouth is too far to the right, but in my defense, i was kind of smirking in the photo. I really liked how the hair turned out! I still need to loosen up a bit, this is apparent in the face, mostly around the mouth. It's a little muddy, but not a big issue. the shadows under the eyes are definitely the part i had the most trouble on. I'm going to work on this some more and try a little less saturation.

Friday, September 17, 2010
Similar, yet so very different
For this part of the assignment, we had to do watercolor and line art with 5 different paintings, but they all focused of the same thing. I did flowers, mostly because it was quick to paint. I did these from my mind, so when i went in to do the line work, i had a general idea in mind by really didn't know exactly what went where, and i do not have much experience painting flowers so some are a little weird. The first one is the first one i did and so on down the line.
 |
| Less detail, more outline work |
 |
| Darker, and added crosshatching shading |
 |
| hints at background structure and leaf detail |
 |
| A lot less detail, painted line on flower, hardly hinting at leaves |
 |
| Dual color in leaves, background leaves turned out well as they have been hinted at lightly, rose has light and dark spots in an attempt to show highlights |
Thursday, September 16, 2010
Waste of time lines
So for this assignment, we had to add digital line to watercolor and let me just say what a waste of time this was. The one assignment where i didn't mind goofing up because i'm adding line in later, i actually get some good watercolors! Let's look at what i had and then how it was slapped in the face by Photoshop's lines.


 |
| Pretty decent hen, i thought |
 |
| Now, a pretty decent waste of cyberspace |
 |
| Might be my favorite piece so far |
 |
| ...and the mustache on the Mona Lisa |
On this one i tried to do a little bit of watercolor and draw in the rest, that failed horribly so i went in with a colored brush to give it the look of a shell and the same color too.

I'm looking at this right now and i'm not sure how well the color shows on here, i'll tinker with the color levels because i can hardly see my lines, but for now this will have to do...
This is the fourth one, I meant it more as a practice in working with straight lines and i thought i did better than previous works. I tried some lines on the light brown field but it just looked redundant, like the other lines in the earlier paintings, hmm, maybe they weren't so out of place.

Ugh, it's like looking at a book of old drawings, yes it still has the third grade look, but those are probably the straightest lines i've drawn in Photoshop yet, not using the line tool that is...
My Fifth Image won't upload "file type not supported" seriously? It's a .jpg! Come on Blogger.com! I'll see what i can do, i might have to rescan...
Wednesday, September 15, 2010
I'd buy that for a dollar! Paint and pen!
For this assignment we had to paint something with watercolor then pen over it and vice versa. I had a lot of trouble with this one because my pen decided to bleed on me, even though it didn't on the last assignment! But i got some experience going back in and correcting. I also had some happy mistakes where my pen ran into my paint and made it darker so i actually repeated it a few times. Let's take a look:
 |
| See where the red bled into my nice taupe wall? |
 |
| This is where my bleeding ink helped darken the melon |
 |
| And i repeated it here |
Tuesday, September 14, 2010
The joy of watercolor continues . . . with architecture!
For Monday's class we had to again do ten 5" x 7" watercolors but we had to focus on architecture this time. Not too bad, i felt like i had to really constrain what i was doing while with painting a landscape i could let my brush go wherever. I feel this would have been a lot easier / i think my paintings would have looked a lot better had the added effect of line art in there. Anyways, here are a few selections:
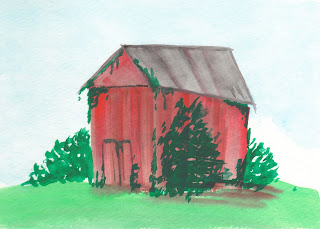
This is a little shed i came up with in my head, it's just barely holding i there, the roof is falling in and it has been overrun with foliage and such. I think the multiple layers on the side really helped give it the impression of age.

Yes, the skyscrapers may look like blue french fries, but i was attempting to give it a far away feel and almost have it fading into the background, hence their color. I also thought the trees in the foreground came out really well!

This is definetly my favorite out of this batch! The clouds came out great! I wanted this to look aged as well so i did a little lifting with a towel when it was still wet.

During class we had to do one of our paintings over again, i decided to do my little shed over again, i thought it came out alright, my green did not show up as well this time around on the shed.
Friday, September 10, 2010
Friday Sept. 10's class: The Watercolor Adventure Begins
We had to come up with ten 5" x 7" watercolor images for Friday's class. I had a fun time with them. I was not to worried about perfecting it and just took it nice and easy. I played around with some different techniques. I seem to favor dry on wet. After a while i ran out inspiration and ended up with a bunch of stinkers, or maybe that's a result of my low watercoloring skills. regardless, here are a few i really liked:
Then in class we had to do one of our ten over again a few times. I chose my mountains, I got some more practice on clouds and painting those little mountains in. Some of the color was lost in the scan so you just have to accept the fact that my scanner was a bit jealous of my ever-increasing watercoloring skills.
 |
| Imagine over that hill is a beach |
 |
| Some far off mountains (my first attempt at clouds) |
 |
| A sunset + river |
 |
| First version |
 |
| Second version; Clouds like much better than before, Mountains are meh... |
Wednesday, September 8, 2010
Watercolor mayhem!
Today in class we broke out the watercolors and saw what everyone could do. I goofed around with different techniques and ended up creating what you see below. This is the first time i have painted with watercolors sine 7th grade i believe...It was alright. I just have to remember to go nice and easy and not overwork anything!
 |
| A nice little landscape with a lake and some happy trees |
Tuesday, September 7, 2010
8.5" x 11" Illustrations
For this assignment we had to do two 8.5" x 11" line art illustrations. I did one in Photoshop and the other by hand. Glancing at them it, it should be apparent which is which. Photoshop was a little nicer this time around, perhaps i'm getting better? That's just absurd. I only had one issue, and that was with the flowers, see, they are sitting on a bed of leaves, but it's hard to give the impression of leaves without all the lines getting confused with the flowers. I tried a few different things including different brushes and sizes, but i ended up just going with the flowers alone, trust me, it looks a lot nicer this way!
 |
| Flower power! |
 |
| An electric van, shocking no? |
Sunday, September 5, 2010
Third Grade Line art, i mean Photoshop Line Art
For this assignment we had to draw five 5" x 7" black and white line art illustrations, BUT WAIT! We had to draw them in Photoshop with a tablet, or a mouse, whichever was working better. I did a few with the tablet and a few with the mouse. I have worked with tablets before but it still takes some getting used to. There was a lot of command-z"ing" because i often found the line i was working with would not do what i wanted it to, this resulting in a third grade quality. I do enjoy working with a real pen and paper better, however i still found this exercise interesting. . . . and frustrating. Below are a few of my favorites. The pipes were done with a mouse and the building was done with a tablet. I got really drawn into some detail with the building then i found it impossible to draw the left side! I hinted at the wall.
.jpg) |
| It's the back of OP! |
 |
| I passed the 3rd grade with this gem here... |
Wednesday, September 1, 2010
More line art excellence
We had to again do 10 5" x 7" line art illustrations, however....this time we had to do them based off of pictures. I placed the pictures under tracing paper and well, drew them! I took a few new pictures and also used some old ones. I found this easier and harder than free-handing. One one hand, i got the proportions perfect, but also felt a need to make every little detail perfect because i knew exactly where everything went. I resisted the urge and found a good balance between detail and simplicity. Make sense? Any who... these are my two favorites. Fun fact, the pipes actually took me the longest time out of any of these.
 |
| Pipes; the under-sink time-consumers |
 |
| Flowers; If you squint hard enough, they will stay the same color |
Subscribe to:
Comments (Atom)